Wednesday, November 14, 2018

iPhone Notes Disappeared? How to Recover Deleted Notes on iPhone/iPad


“Please help. I recently updated my iPhone 8 to iOS 12 and all my notes have disappeared from my iPhone. Can anyone suggest a way to bring them back?”

Nowadays more and more iPhone users tend to use Notes app to record important information like daily schedule or shopping list etc. And "iPhone Notes Disappeared" now is a common problem that users may meet after iOS upgrade, failed jailbreak, or factory reset, etc. How to recover deleted notes from iPhone or iPad? Don't worry. Here in this blog, I'll explain several free simple ways to get your disappeared notes back.

People also read: How to View & Recover Deleted Safari History on iPhone, iPad

Way 1: Recover Disappeared iPhone Notes via Email Settings 

Just like your email, contacts and calendars, the notes on your iPhone are usually stored on a server tied to your email accounts like Gmail, AOL and Yahoo etc. You can set up your email account to get your notes back. On your iPhone, go to Settings > Accounts & Passwords > Add Account > Google (or other email) > Toggle Notes On. Then go back to your Notes app and check if your disappeared notes are there.


Way 2: Get Back iPhone Disappeared Notes via iCloud.com

If you turned on iCloud Notes sync on Settings, you can have a check whether there are some iPhone disappeared notes existing at iCloud.com. On your computer, just open your browser and go to iCloud.com, then login with your Apple ID and click into "Notes" category to undelete notes on your iPhone.


Way 3: Restore Notes from iPhone via iTunes/iCloud Backup

If you often back up your iPhone/iPad with iTunes or iCloud, you can restore your iDevice to the latest iTunes/iCloud backup to get back your lost notes. However, you should know that this method will overwrite your device and replace contents with the data in the backup file, which might result in more data loss.

Way 4: Recover Deleted Notes from iPhone/iPad with Software

FoneGeek iPhone Data Recovery is a professional iPhone notes recovery software. You can recover disappeared/delete/lost notes from iPhone or iPad (including the latest iPhone XS/XS Max/XR, iPhone X/8/7/se/6s/6/5s, iPad Pro, iPad Air 2, iPad mini 4/2, etc). This program lets you preview notes before recovery and recover the notes selectively.

 Download FoneGeek iPhone Recovery Win      Download FoneGeek iPhone Recovery Mac

Below are the steps about how to retrieve deleted notes on iPhone or iPad:

  1. Download and install the FoneGeek iPhone Notes Recovery software onto your computer. Run it and choose "Recover from iOS Device" from "Data Recovery" tool. 
  2. Connect your iPhone or iPad to the computer via USB cable. Then select the data like "Notes" you'd like to recover and click "Start Scan". 
  3. Scan the connected iDevice to find the deleted or disappeared notes. After that, preview them and click "Recover" to save them on your computer or to your device. 

Note: Besides retrieving deleted notes from iPhone, FoneGeek iPhone Recovery software also allows you to retrieve deleted contacts, SMS, photos, videos, WhatsApp, Viber, calendar, reminders, Safari bookmarks, voicemails, voice memos, and more data from iPhone, iPad or iPod touch.

More Topics You Might Interested In:

Tuesday, December 26, 2017

Top 4 Converters to Convert HEIC Photos to JPG Online

HEIC is the default file type for photos being taken on latest iOS 11 devices, such as iPhone X, iPhone 8 or iPhone 8 Plus. It is the file name Apple has chosen for the new HEIF standard, shorts for High Efficiency Image File Format., which stores high quality image in much smaller size. However, at the moment, there are still issues with opening HEIC files on Windows. Luckily, there are many ways to convert HEIC to JPG, keep reading this blog to find out the top 4 HEIC to JPG Converter online.

People also read: 4 Ways to Recover Deleted Photos/Videos on iPhone or iPad

Top 1. Heictojpg.com

Heictojpg.com is the best free online HEIC to JPEG/JPG Converter made by JPEGmini. It is very simple and straightforward to use. Just choose HEIC files from computer or directly drag-n-drop photos onto the website’s interface, and this online tool will automatically convert HEIC photos to JPG. Once converted, you’re given a line to click and that will download the JPG straight to your computer. You can convert single photo or photos in batch, up to 50.


Top 2. Apowersoft Free HEIC Converter

Apowersoft Free HEIC Converter, which is also an online application, converts your HEIF (.heic) images to JPEGs in one go. With user-friendly interface, it is really simple to operate. Users can convert HEIC image one by one or convert multiple images that up to 60 files, and the conversion will be completed in seconds without quality loss. In the process of conversion, users are allowed to keep Exif data if they want. Besides, there’s an optional desktop version available for Windows users.


Top 3. Aconvert.com

Aconvert.com is another HEIC converter online tool designed to convert HEIC files to JPG format. What you need to do is just add the HEIC files to be converted and choose the destination file format, then click on the convert button. You are allowed to change the size of your HEIC image before you convert it. Also, you can not only convert HEIC to JPG, but also other formats like PNG, TIFF, GIF, BMP, etc. However, this online tool cannot convert HEIC images in batch.


Top 4. Converter.asimkt.com 

  Converter.asimkt.com also provides simple and free solution to convert HEIC file to JPG/JPEG format online. As well as Aconvert.com, this HEIC to JPG Converter online cannot convert multiple HEIC images in batch and requires a sign-up to use. Most importantly, there is no “delete” or “clear” button to allow you to remove converted photos from cloud. You have to pay much attention considering the privacy problem.


The Bottom Line

Admittedly, each of the above free online HEIC to JPG Converters has its own attractive points. You don’t need to download any software. However, the conversion can be slow if your network isn’t strong or the server is busy. Also, it can cause a privacy leak since you’re sending your photos through a public server.
  

More Topics You Might Interested In:

Wednesday, December 6, 2017

[Fix] How to Recover Lost Data after iOS 11/11.1/11.2 Update


Apple's latest mobile operating system, iOS 11, launched on September 19, coming with many great changes, like the customized Control Center, 3D Touch, quick markup for screenshots, new App Store, text to Siri, Drag and Drop feature, and much more. Many people are excited to update their iPhone/iPad to the iOS 11 to enjoy all the cool features. However, the new update also brings problems to iPhone and iPad users, and data loss is one of the common issues. If unfortunately, you iPhone/iPad data lost or disappeared after iOS 11 update, is there any way to recover them back? Don't worry, this blog is here to help you recover lost data after upgrading to iOS 11.

People also read: Lost Data after iOS 12 Update? Here is How to Recover It 

How to Fix "iPhone iPad Data Lost/Disappeared" after iOS 11 Update 

FoneGeek iPhone Recovery, a powerful data recovery tool designed for iOS devices, providing 3 modes to help you recover lost data: recover from iOS device directly, recover from iTunes backup, recover from iCloud backup. With it, you can easily recover lost contacts, messages, call logs, photos, videos, WhatsApp, Viber, Kik, notes, reminders, Safari bookmarks, voice memos, etc. after iOS 11 update.

Download Fucosoft iPhone Recovery Win      Download Fucosoft iPhone Recovery Mac

Please download and install the iOS 11 Data Recovery tool to your computer and then follow the simple steps given below to recover lost data from iPhone X, 8/8 Plus, 7/7 Plus, 6s/6s Plus, iPad Pro, etc. after iOS 11 update.

Option 1: Recover Lost Data from iPhone Directly after iOS 11 Update 

If you didn't perform any backup and lost contacts, photos after iOS 11 update, you can use FoneGeek iPhone Recovery directly scan your iPhone/iPad and retrieve lost files without backup.
  1. Connect your iPhone/iPad to the computer with a USB cable and launch the iOS data recovery. Choose the option of "Data Recovery" from the main window and click on "Recover from iOS Device". 
  2. Once the program detected your iDevice, select the type of files that you wish to recover, and then click on "Start Scan" to let the program analyzing and scanning the device for lost files. 
  3. When the scan is complete, all recoverable files will be listed in categories. You preview them one by one and select out the items you need, then click on "Recover" to save them to your computer.  

Option 2. Recover Lost Data from iTunes Backup after iOS 11 Update 

If you've made backup on iTunes before upgrading to iOS 11, you can easily recover lost data on iPhone/iPad after iOS 11 update from iTunes. Here's how:
  1. Click on "Recover from iTunes Backup File" and you'll see a list of iTunes backup files in this computer. Select an iTunes backup file you need and click "Start Scan". 
  2. The program will analyze the iTunes backup and find your missing contacts or photos etc. Once the scanning process is complete, you can preview all the lost files. 
  3. Now select the ones you want to recover and then click "Recover" to save them to your computer in readable formats. 

Option 3. Recover Lost Data from iCloud Backup after iOS 11 Update 

If you did backup your iPhone/iPad data with iCloud before updating to iOS 11, you can try the following steps to retrieve lost iPhone/iPad data from iCloud backup:
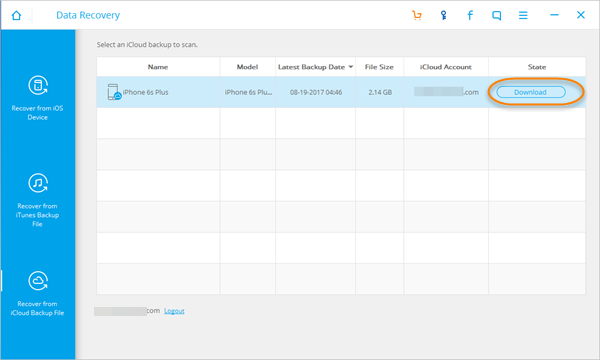
  1. 1.Click on "Recover Data from iCloud Backup File", you'll be prompted to sign in to your iCloud account to gain access to your iCloud backup files. 
  2. 2.Once signed in, choose an iCloud backup file you need and click on "Download", then choose the files you would like to recover from the pop-up and click "Next". 
  3. Once the scan stops, you can preview all data in your iCloud backup file and check the items you need, then click "Recover" to save them to your computer. 

More Topics You Might Interested In: 

Tuesday, November 1, 2016

iPhone Backup Extractor: Extract & Recover Data from iPhone Backup

Why need an iPhone Backup Extractor?

Apple provides iTunes to help iOS users to make a backup copy of iPhone, iPad and iPod touch. After iTunes syncs with your iDevice, it keeps a separate backup file which contains all your data, including photos, videos, contacts, SMS messages, call logs, notes, calendar, voicemails, voice memos, and more. However, the iTunes backup file is not a common file, but a SQlitedb file. It's unreadable and won't allow you to recover data selectively. What's worse, you can't get any data out of it when your iPhone is lost/stolen/damaged and have no other iOS device available. That's why the iPhone backup extractor comes out.

Best iPhone Backup Extractor for Windows and Mac

Need an iTunes backup extractor to recover your iPhone data from iTunes backup? Here FoneGeek iPhone Backup Extractor is strongly recommended. It can find all iPhone, iPad and iPod backups on your computer and lets you extract data from iPhone backup with ease. You can preview contacts, SMS, photos, videos, WhatsApp, Viber, notes etc. in details and recover the data all according to your needs. The software works well with backups of all iPhone models (including iPhone XS/XS Max/XR, iPhone X, iPhone 8/8 Plus, 7/7 Plus, 6s/6s Plus, SE, 6/6 Plus, iPad Pro, iPad Air 2, iPad mini 4/2, etc.) and all iOS versions (even the newest iOS 12).

 Download FoneGeek iPhone Recovery Win      Download FoneGeek iPhone Recovery Mac

To get started, please download this iTunes Backup Extractor from FoneGeek official site and get it installed on your Windows or Mac computer. Then follow the steps below to extract and recover data from iTunes backup:

  1. Run iPhone Backup Extractor for Win/Mac on your computer and choose "Recover from iTunes Backup File" from "Data Recovery" tool. 
  2. All your iTunes backup files will be listed. Choose the one you need and click "Start Scan" to begin scanning. 
  3. After that, all the content in the iTunes backup will be displayed by categories. You can preview them and choose those you want to get back, then click "Recover" to export and save them to your computer. 

Extra Tips:

  • Tip 1: Please don't sync your iPhone with iTunes after you find data loss on your iPhone. Or your iTunes backup file will be updated and overwritten by the content on your iPhone, and your lost data will go forever.
  • Tip 2: FoneGeek iPhone Backup Extractor supports to extract data from iTunes backup and restore them to your computer, not to your iPhone. If you want to transfer music, videos and other data from iTunes to your iPhone, FoneGeek Phone Transfer will help you.


More Topics You Might Interested In: 

Wednesday, September 28, 2016

Complete Guide to Upgrade iPhone/iPad/iPod Touch to iOS 10

Apple has launched iOS 10 on 13th September 2016, which brings a multitude of brilliant new features like redesigned lock screen, innovative Message app, and more powerful Siri etc. Well, you've probably got these questions: should I update my iPhone or iPad to iOS 10, can I update my iPhone or iPad to iOS 10 and how do I update to iOS 10? Don't worry. Here we'll address all these questions in this complete guide. Read this blog to get your answers now.

Should I Update My iPhone or iPad to iOS 10?

iOS 10 brings brilliant new features, however, it also brings you some new bugs and issues. Here we've collected reasons whether you should update to iOS 10 or not.

Pros:

  • Fix previous iOS issues: The new iOS 10 can help to fix previous iOS 9 issues and problems on your iPhone or iPad. 
  • Rick Lock Screen: The lock screen of iOS 10 becomes richer and more powerful, which allows you to view photos and videos, or even respond to messages directly within notification. 
  • Raise to Wake: The Raise to Wake feature makes it quicker to view the notifications on your lock screen. 
  • New features for Message: You can replace any word that you've typed into an emoji, send iMessages with bubble effects, rich links, Didital Touch, handwritten notes, and more. 
  • Delete stock apps: With iOS 10, you can remove part of stock apps like Calendar, Contacts, FaceTime, iBooks, iCloud Drive, iTunes Store, Mail, Maps, Music, News, Notes, Reminders, Videos, Voice Memos, Weather and more from your iDevice. 

Cons: 

  • Potential bugs: Various types of problems are usually common after new iOS updates, such as random reboot, Wi-Fi issues, or app crashing, etc. 
  • Lose previous Jailbreak: Once you move to iOS 10, you will not only lose the jailbreak but you need to wait for new jailbreak for a long time. 
  • Slow iOS device down: New software updates are nice, but when applied to old hardware, you're bound to get a device that's even slower than it was before. 

Can I Update My iPhone or iPad to iOS 10?

Before upgrading to iOS 10, the first thing you need to do is checking the full list of iOS 10 compatible devices and see if your iPhone, iPad or iPod touch can run iOS 10.

iOS 10 is available as an upgrade for the following devices:
  • iPhone: iPhone 6s, iPhone 6s Plus, iPhone 6, iPhone 6 Plus, iPhone SE, iPhone 5s, iPhone 5c, iPhone 5 
  • iPad: iPad Pro, iPad Air 2, iPad Air, iPad 4, iPad mini 4, iPad mini 3, iPad mini 2
  • iPod touch: iPod touch 6 

While the following devices can't upgrade to iOS 10: iPhone 3G, iPhone 3GS, iPhone 4, iPhone 4s, iPad, iPad 2, iPad 3, iPod touch 2, iPod touch 3, iPod touch 4, iPod touch 5

How to Install iOS 10 on Your iPhone, iPad or iPod Touch? 

You can update your iPhone, iPad, or iPod touch to iOS 10 wirelessly or with iTunes. Before you update, please make a backup of your iDevice using iCloud or iTunes.

Update to iOS 10 Wirelessly

Generally, when the software update is available, you will receive a message and just tap Install Now. If you miss the pop-up, just follow the steps below:
  1. Plug your device into power and connect to the Internet with Wi-Fi. 
  2. Tap Settings > General > Software Update. 
  3. Tap Download and Install and follow the prompts: Enter Passcode > Tap on Agree on Terms and Conditions > Tap on Agree to confirm. 
  4. Tap on Install Now to start the update process. 


Update to iOS 10 via iTunes

If you can't update wirelessly on your iOS device, you can update manually using iTunes on a computer that you trust. Here're the steps:
  1. Download and Install the latest version of iTunes on your computer. 
  2. Open iTunes and connect your iPhone, iPad or iPod touch to computer via USB cable. 
  3. Click on the Device tab and then choose Summary. 
  4. Click on Check for Update > Choose Download and Update > Select Agree to confirm. 
  5. Enter your Passcode on iPhone, iPad or iPod touch. 

Hope this guide can help you update to iOS 10 on your iPhone, iPad or iPod touch successfully. After the update, you may meet some problems like Data Loss. If you lost important data like contacts, messages, notes, photos and more from your iDevice when updating to iOS 10, don't panic, FoneGeek iPhone Recovery software can help you recover lost data on iPhone/iPad/iPod, even without backup.

Monday, September 12, 2016

iPhone 7 and 7 Plus: Should You Upgrade to It?

After months of rumors, the most-expected iPhone 7 and iPhone 7 Plus are finally here with many pros, such as advanced new camera systems, immersive stereo speakers, brightest and colorful display, water resistance, wireless charging, no headphone jack, etc. Should you upgrade to iPhone 7 or 7 Plus? If you are still sitting on the sidelines for picking up Apple's next flagship, here're some stunning features about the new iPhones.

Static Home Button

The home button of iPhone 7 is now solid state, which means you can't physically press or click it in. It's pressure-sensitive, including "taptic feedback", which just means that apps can give you three levels of pressure and haptic feedback, like a light or strong buzz.

* Waterproof Design

Both the iPhone 7 and 7 Plus are water-and-dust-resistant (IP67), meaning you're free to get them wet without worry. That means you'll be able to take either of them underwater for about 30 minutes, up to 1 meter deep.

* No Headphone Jack

The iPhone 7 and 7 Plus no longer feature a 3.5mm headphone jack. Instead, Apple's new EarPods headphones will connect through the Lightning connector port. Apple is also pushing new, funky-looking AirPods headset connects wirelessly through auto-pairing.

* Huge Camera Jump

The iPhone 7 keeps the 12-megapixel camera, but adds a larger aperture and this is a big deal – optical image stabilization that keeps images steadier. And the iPhone 7 Plus gets a second, 56mm telephoto lens on the back that works like a built-in zoom feature.


* Improved Battery Life

Apple's mediocre battery life finally get improved on iPhone 7 and 7 Plus. The new iPhones has a Bigger battery than the iPhone 6S and 6S Plus. Good news for those who suffered with the battery downgrade between the 6 and 6S.

* Wireless Charging

As Samsung Galaxy S6/S6 Edge takes leading step of wireless charging, iPhone 7 loath to lag behind, embracing wireless charging technology with a maximum distance of 15 feet.

* Faster A10 Processor

The iPhone 7's new A10 Fusion chip is a 64-bit, quad-core processor that Apple says is 40 percent faster than last year's A9 processor. The powerful A10 processor takes things to an entirely new level, making best use of CPU and GPU with 6 cores, delivering a performance boost of 20% and reducing power consumption by 40% simultaneously, compared to iPhone 6S.

* More Color Choices

Apple is also bringing more colors to the iPhone 7, so in addition to silver, gold and rose gold, you can also choose between a glossy "jet black" and a matte black color. The jet black replaces the famous space grey color.

* More Storage Options

iPhone 7's 256GB storage option finally comes to use, which is reasonable especially when it ships with 12-megapixel dual-lens camera. The end of 16GB is a main iPhone 7 advantage over iPhone 6S/6 and fits the bill of many multimedia maniacs for 4K video shooting tasks.


>> Must-Have Tool for iPhone 7 - Backup/Restore iPhone 7 Data

This is a classic dilemma: you shot many memorable pictures but accidentally deleted them on your iPhone 7. What should you do? In such case, we recommend you use FoneGeek iPhone Data Recovery. This software can help to export data on your iPhone to computer for backup. Also, it allows you to recover deleted photos, videos, contacts, messages, WhatsApp, Viber, notes, etc. from iPhone 7/7 Plus.

More Topics You Might Interested In:

Tuesday, August 23, 2016

How to Make an Archived iTunes Backup of Your iPhone/iPad

Regularly backing up your iPhone to iCloud or iTunes is likely routine for most iOS users. But if you want to upgrade to a beta version of iOS (like iOS 12) or you want to downgrade shortly after installing a new iOS update, you'll want to create an archived backup on iTunes. Well, an archived iTunes backup is essential because it saves the current state of your iOS device and prevents it from being accidentally overwritten by subsequent backups.


Here's how to mak an archived backup of iPhone/iPad using iTunes: 

Part 1: Create an Backup 

  1. Connect your iPhone or iPad to a Mac with the latest version of iTunes installed and open iTunes. 
  2. Click on the device icon in iTunes. In the backup section, choose "This computer". You can select "Encrypt iPhone backup" and set a password for your backup. 
  3. Click "Back Up Now" and wait for the backup process to finish. It will take several minutes to complete. 

Part 2: Archive the Backup

  1. To archive the backup, choose "Preferences" from the iTunes dropdown menu and click on the "Devices" tab. 
  2. Choose the backup you just created, right-click on it and select the "Archive" option. 

Once archived, a backup will be marked with the date and the exact time that it was archived. The next time you backup, iTunes will create a new backup for that device, leaving your previous Archive intact. Please note this guide is for iTunes users on the Mac. If you are using iTunes on a Windows PC, you should rename your iTunes backup folder or move it to another location to prevent it from being overwritten.


How to extract and recover data from archived iTunes backup? 

The backup of your iPhone/iPad contains all your data, including photos, videos, contacts, calendar, SMS messages, voicemails, notes, call history, which are not readable. Here we'd like to recommend the FoneGeek iPhone Data Recovery to help you get data from the iTunes backup to your computer.

Download FoneGeek iPhone Recovery Win      Download FoneGeek iPhone Recovery Mac
  1. Simply download and install the iPhone Data Recovery from FoneGeek official site onto your computer. 
  2. Run the program and select "Data Recovery". Then choose "Recover from iTunes Backup File". 
  3. Select an iTunes backup file, and then click "Next" to begin scanning data in the backup. 
  4. Preview the contents extracted and choose those you need, then click "Recover" to save them to your computer. 

More Topics You Might Interested In: